Roland ADA-7000 Owner's Manual
Browse online or download Owner's Manual for Video converters Roland ADA-7000. Roland ADA-7000 Owner`s manual User Manual
- Page / 24
- Table of contents
- TROUBLESHOOTING
- BOOKMARKS
- ADA-7000 1
- IMPORTANT SAFETY INSTRUCTIONS 2
- SAVE THESE INSTRUCTIONS 2
- USING THE UNIT SAFELY 3
- IMPORTANT NOTES 5
- Table of Contents 6
- 5MANUAL Button 8
- 6 CLOCK SOURCE Button 8
- 7 SAMPLING FREQ Button 8
- 8POWER Switch 8
- Rear Panel 9
- Front and Rear Panels 10
- An Example of Connection 11
- Turning the Power On 12
- Block Diagram 13
- Concerning Copyright 14
- Troubleshooting 15
- Supplementary Notes 16
- FRONT PANEL CONTROL 17
- Clock source setting 17
- ADA-7000 setting 19
- VSR-880 setting 19
- Specifications 20
- Shanghai Xingtong Acoustics 21
- Equipment CO.,Ltd 21
Summary of Contents
8-Channel AD/DA ConverterADA-7000Owner’s ManualThank you for purchasing the Roland ADA-7000 8-Channel AD/DA Converter. By connecting the ADA-7000 to a
10Front and Rear PanelsTERMINATOR Switch:Turn this on if the ADA-7000 is the last device in the word clock signal chain. Normally you will leave this
11An Example of ConnectionAs an example, we will explain how to connect a Roland VM-7200 mixing processor.* To prevent malfunction and/or damage to sp
12Turning the Power On* Once the connections have been completed (p. 11), turn on power to your various devices in the order specified. By turning on
13Block Diagramfig.5R-BUS (RMDB2) Circuit Connectionfig.67/85/67/8BNCON96 kHzOFF75 Ω5/6123PA D SENSPEAKA/D-20 dB+–123213213PA D SENSPLLINTERNALCLOCKPE
14Concerning CopyrightThe law prohibits the unauthorized recording, public performance, broadcast, sale, or distribution etc. of a work (CD recording,
15TroubleshootingIf the ADA-7000 does not function correctly, please check the following points before you suspect a malfunction.If checking these poi
16Supplementary NotesHow to connect the VM-7000 series and the ADA-7000To connect the VM-7200/7100 and the ADA-7000 via R-BUS, VM-24E I/O Expansion Bo
17Supplementary NotesIf the system software of the VM-C7200/C7100 is version 1.10 or later;If the system software of the VM-C7200/C7100 is version 1.1
18Supplementary NotesHow to connect the VM-3100Pro and the ADA-7000ConnectionConnect the VM-3100Pro and the ADA-7000 with the R-BUS cable attached in
19Supplementary NotesADA-7000 settingCheck if the clock source on the ADA-7000 is set to R-BUS. When the ADA-7000 is booted up, the clock source is se
CAUTIONRISK OF ELECTRIC SHOCKDO NOT OPENATTENTION: RISQUE DE CHOC ELECTRIQUE NE PAS OUVRIRCAUTION: TO REDUCE THE RISK OF ELECTRIC SHOCK,DO NOT REMOV
20Specifications8-channel AD/DA Converter ADA-7000Signal ProcessingAD Conversion: 24 bits, 64 times oversamplingDA Conversion: 24 bits, 128 times ov
InformationWhen you need repair service, call your nearest Roland Service Center or authorized Roland distributor in your country as shown below.As of
22Memo
This product complies with the requirements of European Directives EMC 89/336/EEC and LVD 73/23/EEC.For EU CountriesFor CanadaThis Class B digital app
02015012 ’01-11-E1-21KS
3USING THE UNIT SAFELYUSING THE UNIT SAFELY001• Before using this unit, make sure to read the instructions below, and the Owner’s Manual...
4USING THE UNIT SAFELY013• In households with small children, an adult should provide supervision until the child is capable of following all the rule
5IMPORTANT NOTES291bIn addition to the items listed under “IMPORTANT SAFETY INSTRUCTIONS” and “USING THE UNIT SAFELY” on pages 2 and 3, please read an
6Table of ContentsFront and Rear Panels...7Front Panel...
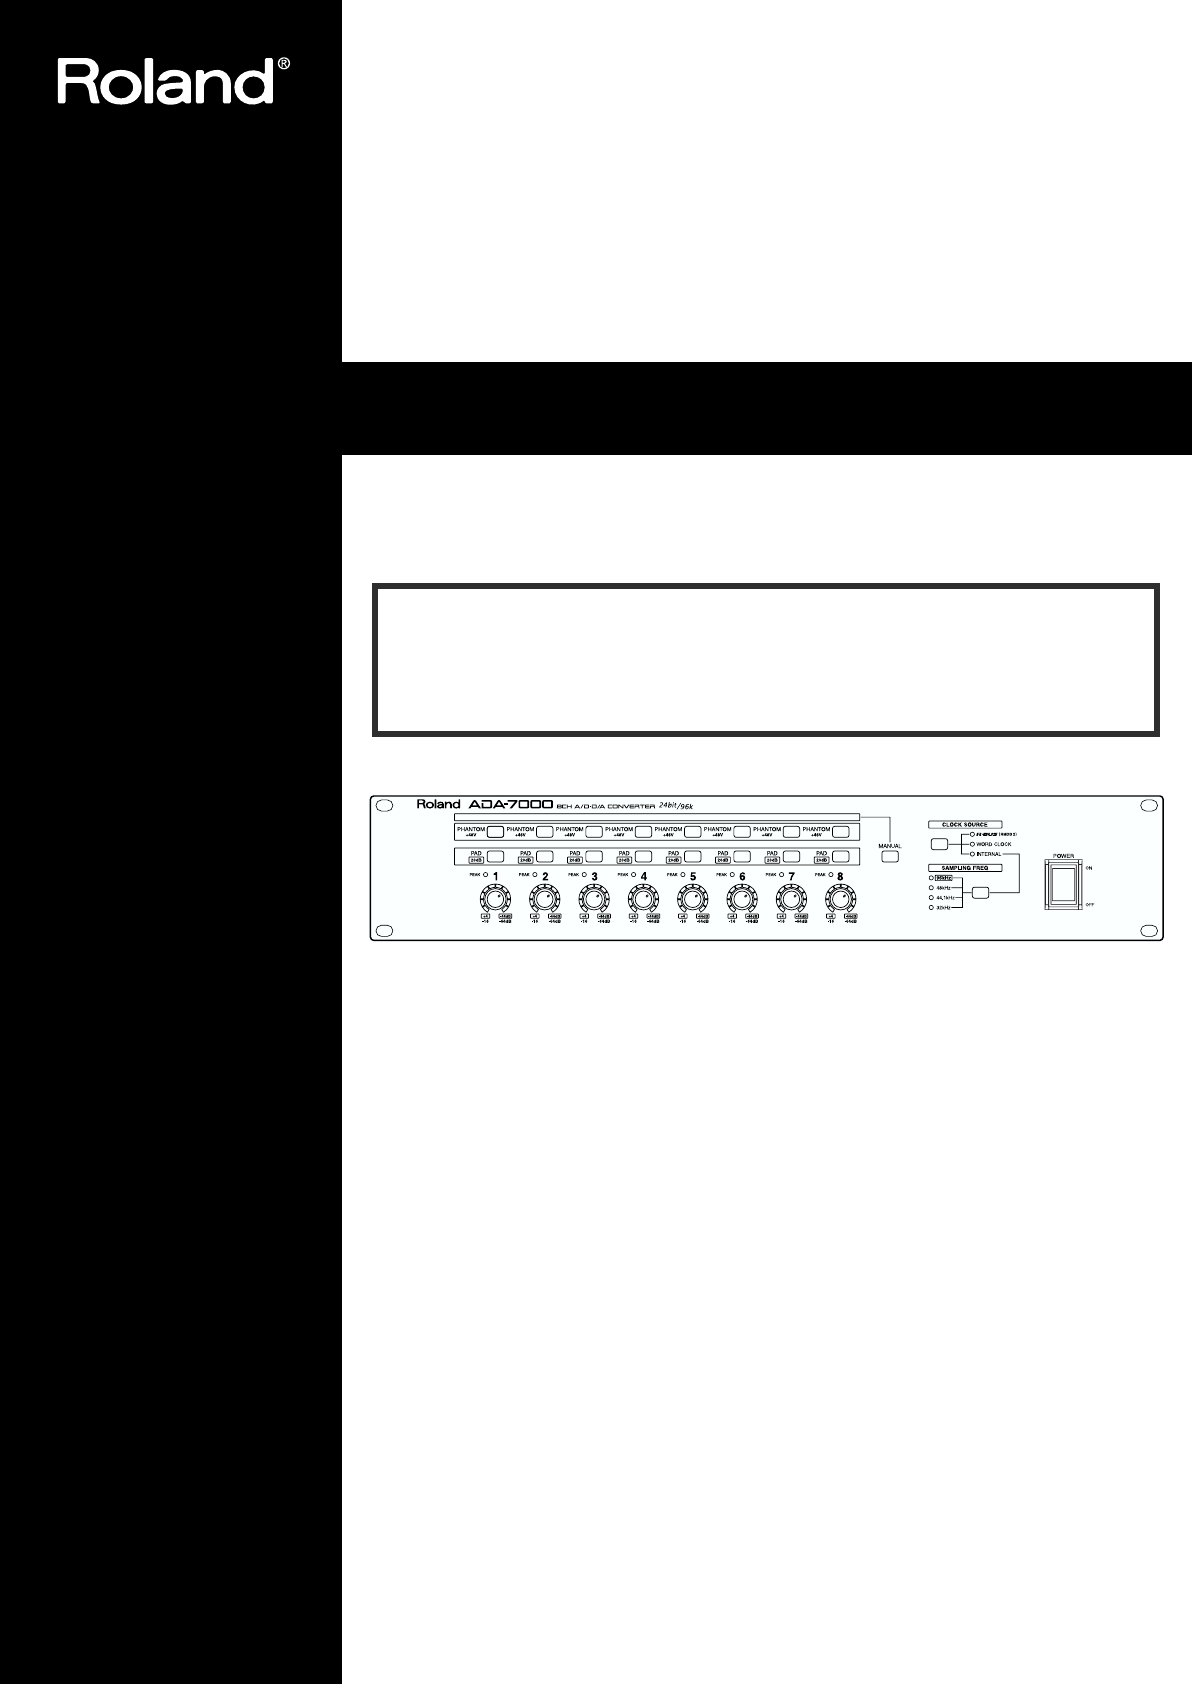
7Front and Rear PanelsFront Panelfig.1In some cases, it may be possible to make settings on the device connected via R-BUS to disable front panel oper
8Front and Rear Panels5MANUAL ButtonSelects whether operation of the front panel PHANTOM buttons / PAD buttons / INPUT sensitivity knobs will be enabl
9Front and Rear PanelsRear Panelfig.21 AC INConnect the included power cable here.To avoid malfunction, connect only the power supply cord that was su
Related products and manuals for Video converters Roland ADA-7000
 (6 pages)
© 2020, manymanuals.com. All rights reserved. | 0.523 s |
 Manymanuals.com
 Manymanuals.de
 Manymanuals.fr
 Manymanuals.it
 Manymanuals.pl
 Manymanuals.cz
 Manymanuals.es
 Manymanuals-pt.com
Comments to this Manuals